Why Ride Outside
Training outside is an important part of developing your cycling skills. Frankly, there is little substitute for riding your bike, changing your gears, and being on a real road. The fact is, you need this training, and the more time you spend on your bike, the better cyclist you will become.
Basic Signaling
Signaling is a critical part to safely riding whether solo or in a group. Watch this video to learn the basic signals to communicate effectively with other riders, vehicles and be safe.
5 Essential Skills
These are five essential skills that will make you a more confident rider. These skills do take practice but aren’t too difficult to master, they will help you become more comfortable when riding in a group and out on the open roads.
How To Corner
Riding around corners on your bike is inevitable, but cornering quickly and safely is a skill you need to work on. This video shares a few top tips so you can corner like a pro.
How To Descend
Descending on a road bike at speed is a skill that develops with age and experience but it’s also one of the best parts of a ride. This video shares tips for riding downhill faster whilst still being safe.
Getting Out of New York City To Ride
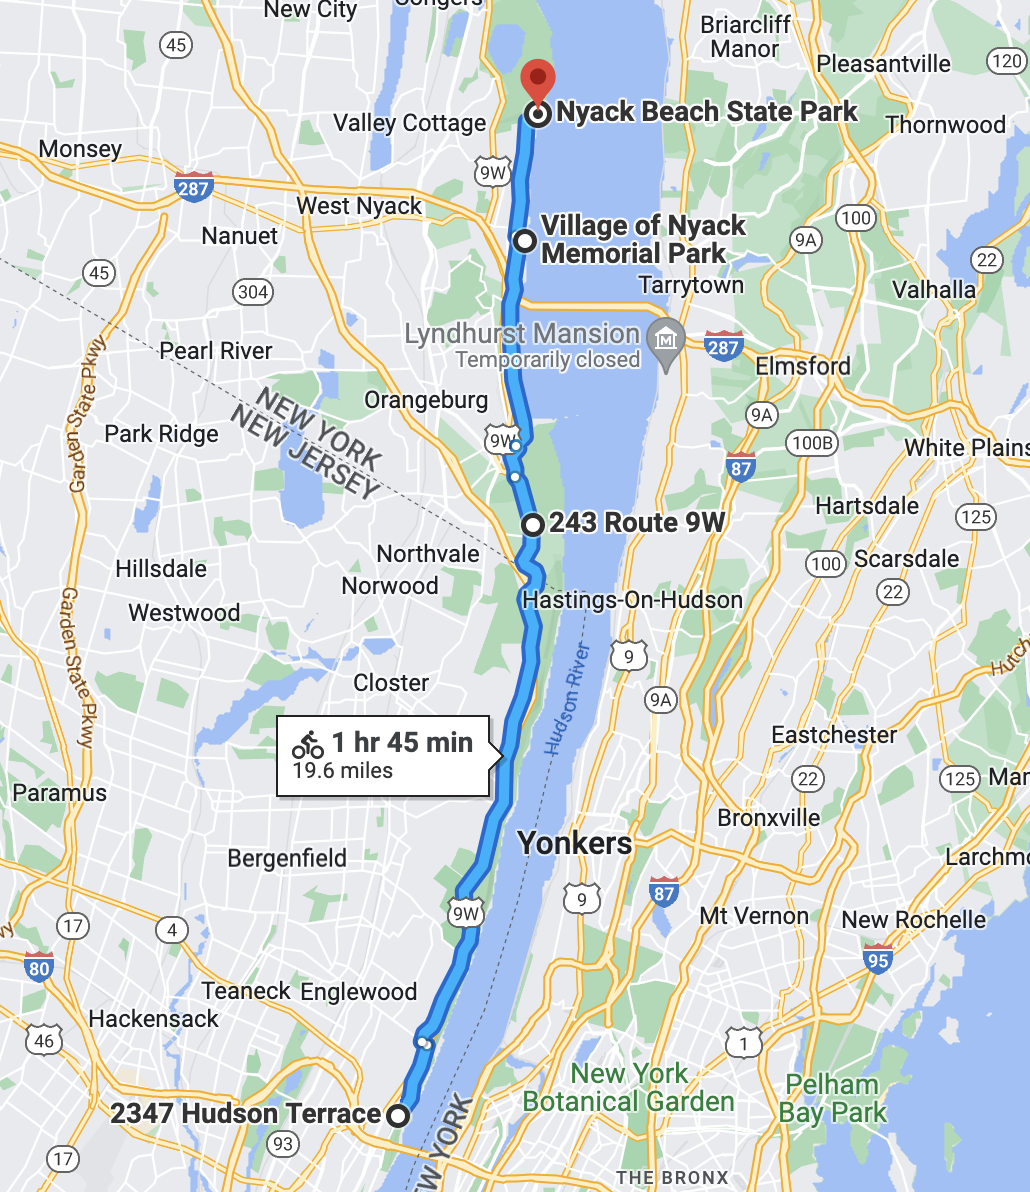
Most cyclists in NYC cyclists take the (HRP) Hudson River Park pathway over the George Washington Bridge to NJ, and then ride 24-46 miles up the 9W. It’s a great workout and a known cyclist route!
Getting to the George Washington Bridge via HRP, while beautiful, is very congested and we see athletes involved in accidents (not to their fault) along this route (regardless of their ability). Some have even had to stop training and take time to recover.
This is not meant to scare you, but to reinforce how strongly we feel you should find a way to start your rides on 9W only after crossing the George Washington Bridge.
A favorite place to begin your ride once you reach New Jersey is “Strictly Bicycles” It’s the local start/stop for most cycling. Just be mindful of where you park.
As you cycle north up 9W, there are three destinations worth exploring:
9W market – 12 miles from Strictly Bicycles
Village of Nyack Memorial Park – 17 miles from Strictly Bicycles
Nyack Beach State Park – 20 miles from Strictly Bicycles
Essentials For Every Ride
These are some of the essentials you should take with you when you ride outside. While the top of the list is a bike, obviously, the following will help you be a more prepared, safer, and more confident rider.
Wear
– Helmet
– Glasses
– Padded Cycling Shorts
– Jersey Cycling Top
– Cycling Shoes with Cleats
On Your Body or Stored
– Waterbottles
– Nutrition
– Mini Pump or CO2
– Spare Tube & Patch Kit, Sealant (for tubed tires)
– Small Multi Tool
– 2 Tire Levers
– Saddlebag
– ID & Mobile Phone
On Your Bike
– Cycling Computer or Speed/Cadence Sensors
In Your Bag or Car
– Pump
– Cycling multi-tool w/ Allen wrenches
– Sunscreen
Wear
– Helmet
– Glasses
– Padded Cycling Shorts
– Jersey Cycling Top
– Cycling Shoes with Cleats
On Your Body or Stored
– Waterbottles
– Nutrition
– Small Multi Tool
– Mini Pump or CO2
– Spare Tube & Patch Kit, Sealant (for tubed tires)
– 2 Tire Levers
– Saddlebag
– ID & Mobile Phone
On Your Bike
– Cycling Computer or Cadence/Speed Sensors
In Your Bag or Car
– Pump
– Cycling multi-tool w/ Allen wrenches
– Sunscreen
Cycling Pre-Ride Inspection
Your bike is a vehicle. With proper maintenance, your bike should last as long as you take care of it. However, you also need to inspect your bike before each ride. Here’s a quick hit list:
- Check the tire pressure of your wheels
- Inspect your wheels for any tears or punctures
- Ensure the quick-release skewers are tightened correctly
- Ensure your batteries are charged (if you have electronic shifters)
- Test your shifters
- Test the brakes
- Lube your chain (every 3 months)
Don't Ride With Headphones On
Hearing traffic keeps you aware of your surroundings – which comes down to safety. Research has has shown that headphones can distract your brain, which is about the last thing you want when sharing the road with cars, scooters, pedestrians, and feisty pets. Let’s not forget, you also have cars and trucks to your sides that are driving faster than you, and people opening car doors along the sidewalk
Beyond that, racing requires total focus on the bike. In a race you should constantly be evaluating your surroundings, your speed, your power output, and even your cadence. All of these factors impact your speed on the bike. Train the way you plan to race. Remove all distractions and focus on your performance.
Keep Your Head Up
Look out in front far enough ahead so you can react to any obstacles in the road or on the shoulder in front of you. Hazards are everywhere. Things like storm drain grates are very bad for skinny road bike tires. Debris can fly off someone’s back tire towards you, and potholes can cause your bike to dead stop and send you over the handlebars.
Nutrition and Hydration
Nutrition –
Carbohydrates are our body’s preferred source of fuel for cycling. We can store (in the form of glycogen within our liver and muscles) enough fuel for approximately 90 mins of exercise at any one time. Anything beyond that means we need to ensure that we intake extra carbohydrates at regular intervals. When our bodies run out of energy, our cycling essentially grinds to a halt.
Depending on the intensity of your ride, you should aim to intake between 30g-60g of carbohydrates every 60-90 minutes.
Hydration –
Staying hydrated when cycling is critical for the digestion of food and maintaining a high level of performance. Dehydration, even in its mildest form, can really slow you down and leave you feeling ill and with a headache after your ride.
When you ride, you want to drink enough to match the fluid lost through exercise, which can be through sweat and urine both during and after your ride. You also want to keep your body well-balanced with electrolytes and maintain a healthy pH balance in your body fluids, so adding salt or electrolytes to your water bottles is key.
To properly rehydrate you and keep you on the road, you should aim to intake 500ml of water for every 0.5kg of body weight you lose.
Tubeless vs. Tubed Tires
There are two main types of tires that triathletes use on their road or TT bike – tubeless and tubed tires. We will explain the difference between the two and how to change each of them when on the road or during a race.
Tubeless Tires –
Tubeless tires are quickly becoming one of the most popular tire choices for triathletes. Essentially, these tires do not have inner tubes, and use liquid sealant and extremely tight beads to hold air in the tire and keep it (virtually) glued to the rim.
If you’re going to use tubeless tires, you’re going to need tubeless-ready rims with rim tape and when you install them you’ll put sealant inside.
They are loved for many reasons, including fantastic puncture resistance and the ability to run at extremely low tire pressures, providing you an advanced level of bike handling with increased grip in the corners on all types of surfaces including gravel, mud, dirt, and wet pavement.
The sealant is important because it acts as a quick and temporary seal for all-but-catastrophic tire punctures. If you happen to run through glass or a small nail on tubeless tires, you might not even notice because the best tubeless tire sealant will fill the hole and maintain tire pressure while you’re still riding.
Here’s how you choose and set up a tubeless tire –
If you get a simple flat or a severe puncture while training or racing on a tubeless tire, here’s how to manage it and get you to the finish line or back to home base.
Tubed Tires –
Tube tires are named for having an inflatable tube inside the tire, and have been the norm since the inception of the bicycle. Spare tubes and patches are incredibly cheap and can be bought anywhere in the world. They are also quicker and easier to set up, but they are heavier and don’t perform as well as “tubeless tires” and are less desired by top elites today.
Here’s how to change the inner tube if you get a flat tire:
Fixing A Slipped Chain on Your Front Cog
We’ve all been there. We’re riding full throttle in the race, we’re changing gears, and then all of a sudden our chain slips off the front cog. Usually it’s because of poor gear shifting or riding while shifting.
In the event this happens, this section of this video will teach you how to quickly get your chain back on and you back in the race:
Cycling in the COLD or RAIN
There is no such thing as “bad biking weather”. Essentially, your decision to ride should take into consideration your tolerance, road conditions, the type of training you have planned, and other factors such as wind direction. Here are a few tips to help you tackle cold or rainy rides.
- Bike brakes are much less effective when wet. Take it slower than usual and give yourself LOTS more time to stop.
- Metal, painted, and brick surfaces can become very slippery during and after the rain. This means watching out for train tracks, utility hole covers, bike lane markings, etc. When you cross over them keep your handlebars straight, not turning, to avoid a slip.
- Hands and feet get the coldest when biking, if wet and unprotected. If you plan to bike more than a couple of miles in the rain, make sure both are covered with waterproof and well insulated material.
- Beware of puddles. Even little ones can hide things like potholes, nails, or glass, which can cause a flat tire or a crash.
- Wipe water and dirt off the metal bike wheel rims, after you ride, front and back. This will ensure that the brakes are still effective the next time you take your bike out.
- Wipe water off the chain after a rain ride, and squirt on a little bike lubricant if possible. This removes grit and prevents rust from building up on the chain, extending its life.
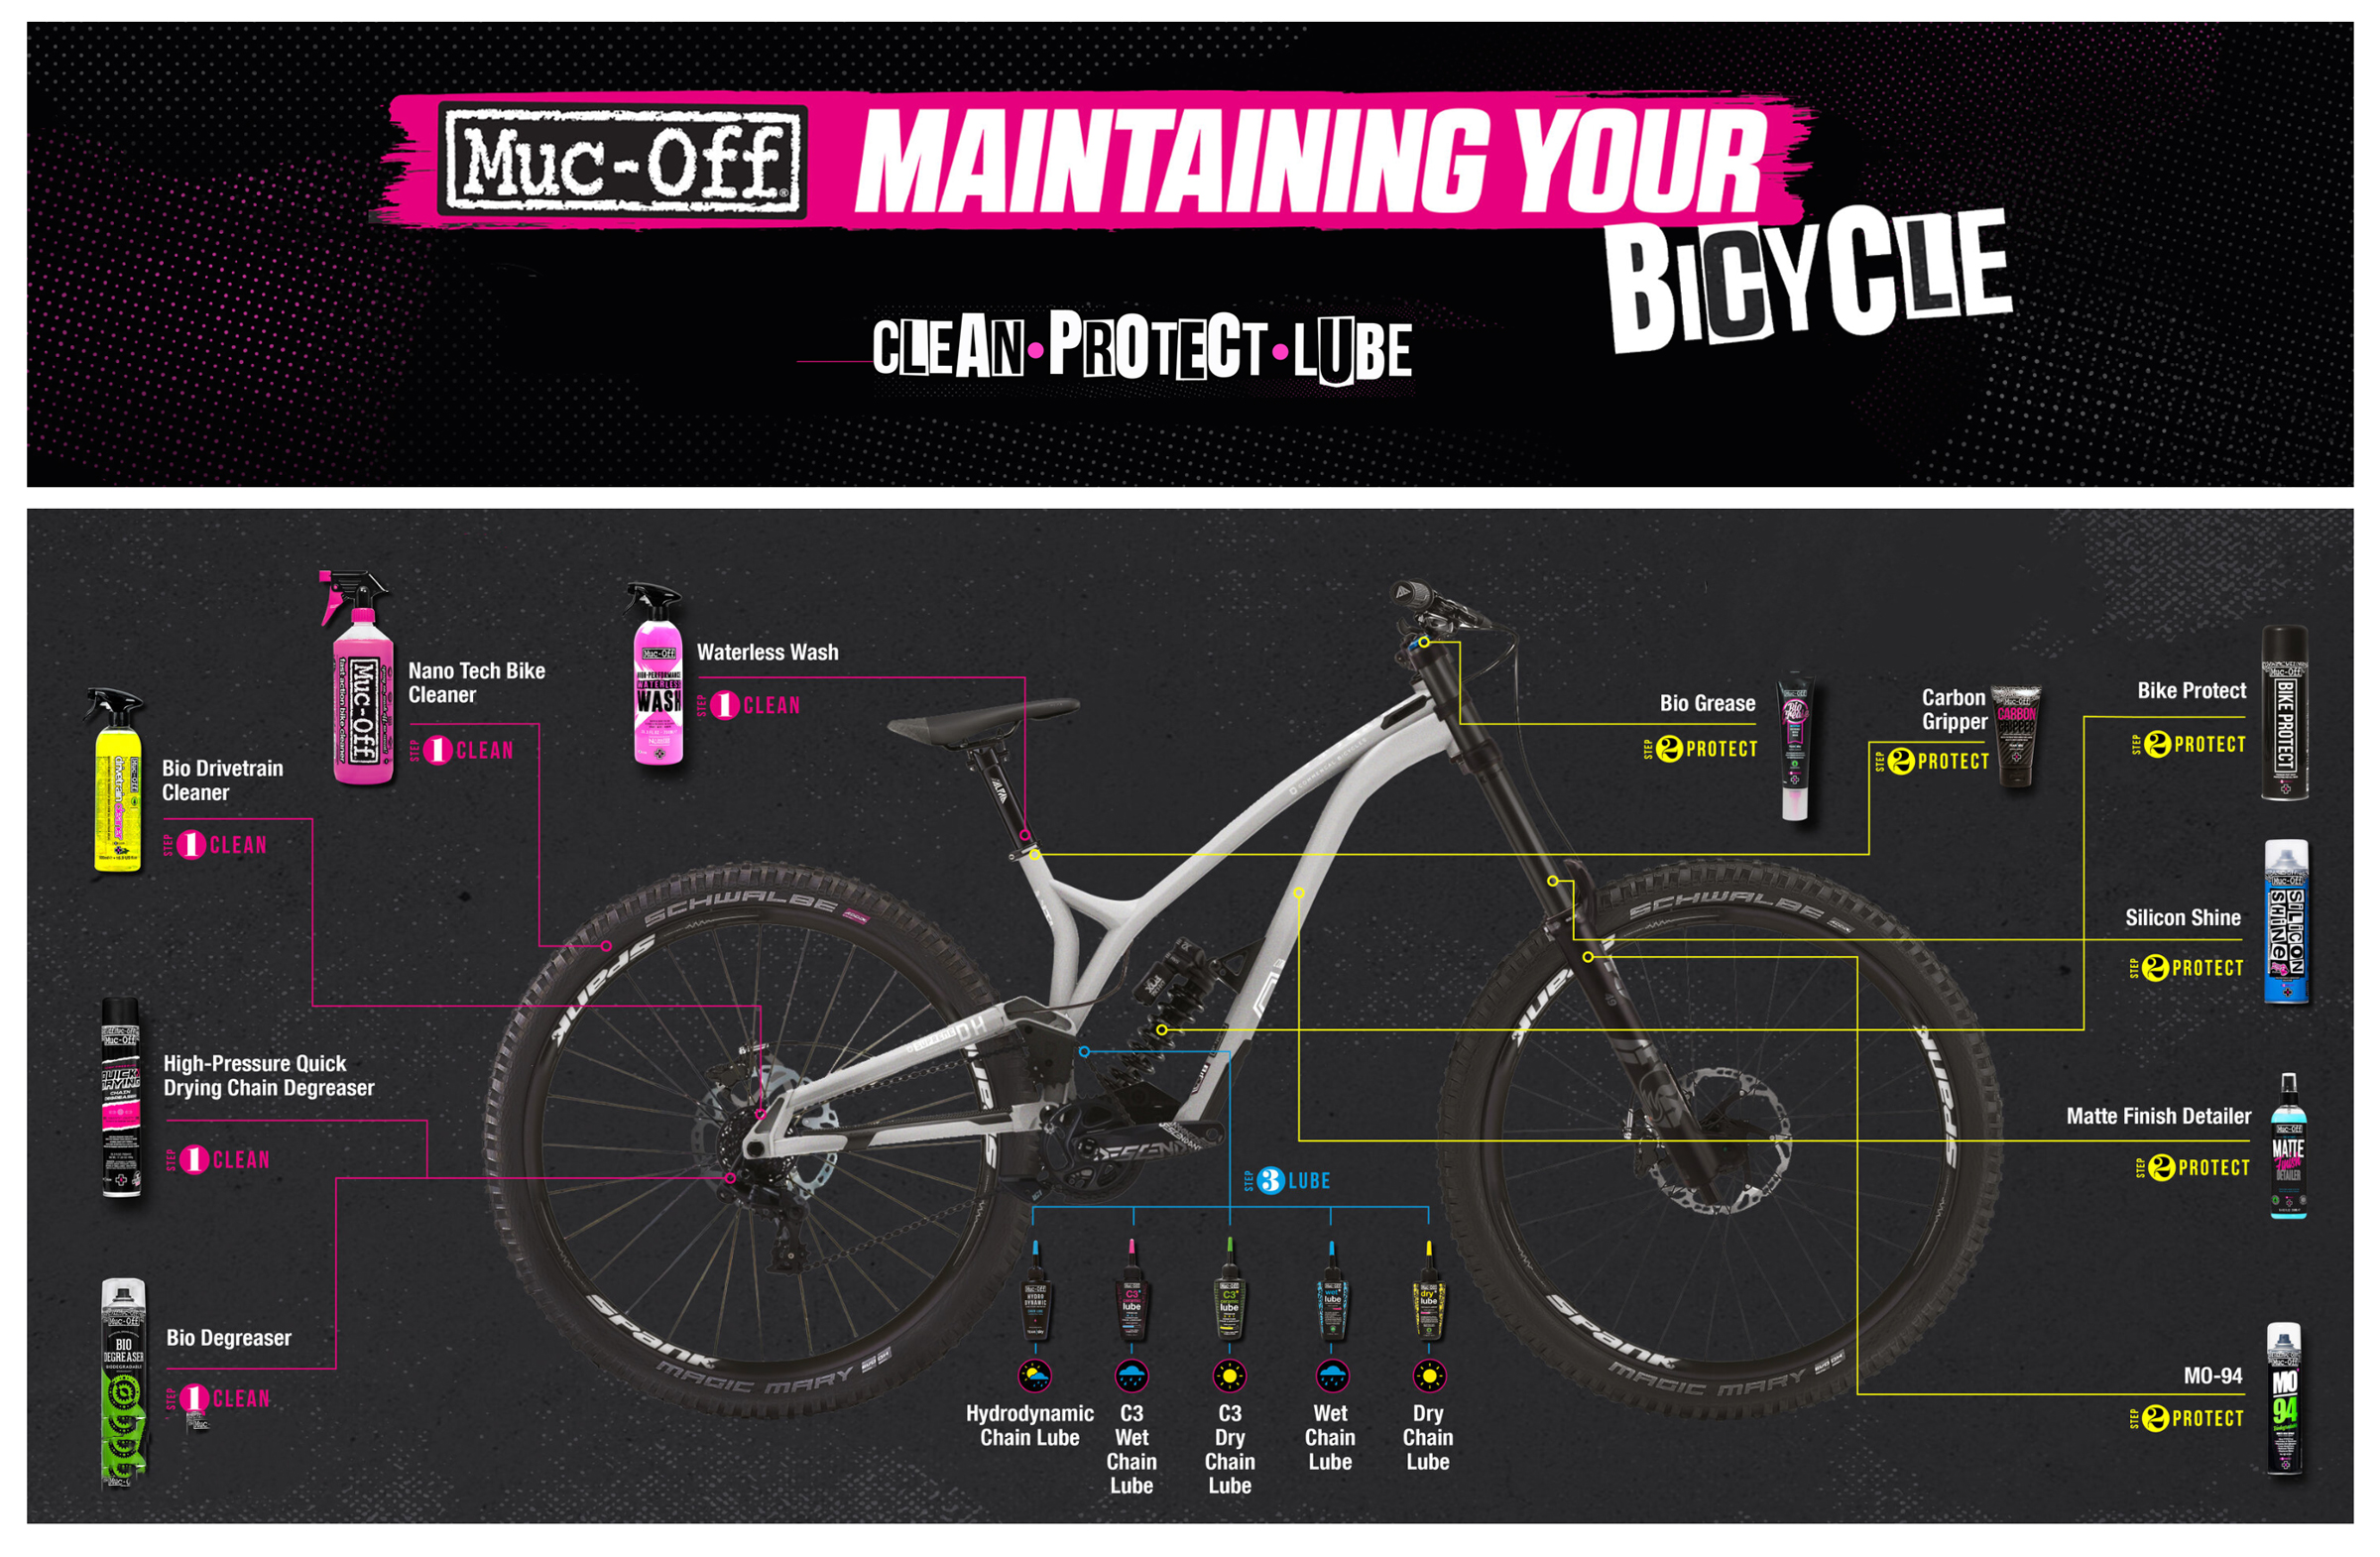
Bike Maintenance
With proper maintenance, your bike should last as long as you take care of it. Keeping your bike parts properly cleaned (after each ride) and lubricated (every 3 months) is crucial for good performance.
Here are (3) important maintenance tips to follow:
- Keep your chain and drivetrain meticulously clean. A clean chain loses fewer watts and all of the parts last longer. It depends on whether you are using wax or lube, but generally, it will require lubricant every 100 miles and a complete cleaning of the chain and rings every 300-500 miles.
- Change the sealant every 3 months if you have tubeless tires.
- Perform a tune-up twice yearly with a professional mechanic to ensure that complex, hard-to-evaluate components such as spokes, bearing surfaces, derailleurs, and cables are inspected and serviced regularly.
The following diagram details various products you can use to clean, lube and protect your bike on a regular basis.